
North American Mig Consortium (NAMC) was formed to share ideas, build techniques and test results in pursuit of a park jet that suits our flying styles. This additionally will be a forum to freely post and share ideas and have a lot of fun! If you don't have gmail or google accounts and want to send us questions, please do so at scott@migsrus.com. Your e-mails may be re-posted in the blog to benefit other followers. Puto, Consilium, Test et Convalidandum; Think, Design, Test, and Validate
Tuesday, December 16, 2014
Merry Christmas!
Every now and then we need a break from our thoughts and time being consumed with Migs.
My wife and I started putting together a Christmas CD years ago that we gave to our friends. The CDs always start a little crazy for the kids and then wind down to a soothing classical piece.
This year I've gone 21st century and posted it on the web.
Merry Christmas
Stephan
Christmas Music

Monday, December 15, 2014
"Differential spoilerons" for high alpha handling
Hi everyone -
I was out dialing in a plane today trying to optimize it's balance and handling for best high alpha performance.
Since Stephan wrote this great article http://migsrus.blogspot.ca/2014/12/trimming-rc-airplane-determining-cg.html , I have been trimming all my planes using this method and have noticed a much more responsive and balanced plane as a result as well as my CG and components being moved back significantly. I had obviously just grown used to flying my planes far too nose heavy and didn't really notice until Stephan educated me on these new methods of properly finding CG and trimming the plane for a more balanced and maneuverable setup. Big thank you to Stephan once again... :)
The planes all rotate much better in all axes which makes general handling and aerobatics much more fun and responsive.
However, as the weight has been moved back and the rotation made easier, I have also noticed the affect of prop wash in high alpha has become more pronounced, especially on the Mig I was flying today.
Stephan and I have both written articles that might help understand better what we mean about the affects of prop wash in high alpha
http://migsrus.blogspot.ca/2014/08/mig29-v4m3e3-hi-alpha-testing.html
http://migsrus.blogspot.ca/2014/08/the-high-alpha-right-turn.html
So today as I was dialing in this plane, I found that right turns in high alpha were a real challenge and that if I took my thumb off the rudder stick, it would do a left turn on it's own, completing a full circle in about 25 ft. So I suppose I could just turn left all day, but that gets pretty boring after awhile and doesn't challenge my skills much. So I fought with it, had the tail slide around pretty aggressively a few times as the rudder bit too aggressively in right turns and at one point over controlled/dumb thumbed my way into the ground. So a bit of a nose "gonk", my pride hurt more than my plane, it will be easily fixable.
But as I did my short, solitary "walk of shame", I started wondering if there was some way I could put a setting in my radio to help offset the effects of prop wash to make high alpha a bit more manageable and right turns not so difficult.
I use a Turnigy 9x radio with er9x firmware, so it is far more capable than I will probably ever utilize, but it is pretty versatile for the price.
So at first I thought about having a switch where when I started high alpha I could select preset rudder trim to the right. This would help, but would then reduce my rudder travel to the right if I needed it (which I knew I would). It is also another switch to select in addition to spoilerons which I like to use for high alpha to help keep the plane more stable and the nose up a little higher without too much elevator/elevon deflection. Not a good option as too many switches spells trouble for my limited skills.
Then I thought, why not have the spoilerons deflect differently? In other words, have the right spoileron deflect a bit more, helping to keep the plane from pulling left all the time. I'm sure others have thought of this and use it, but honestly I never have heard or read about anyone using it. I have always been locked into the paradigm that both spoilerons have to be deflected the same amount in high alpha, drilled into me by whoever had my attention at the time when I was still learning high alpha.
So as I looked at the blemished nose on my plane I thought, what the heck, I've had one crash already, what is the worst that could happen?
So since I can adjust the "weight" or percentage of the spoileron deflection individually in each of the "aileron/spoileron" servos without affecting how the aileron works when spoilerons are not employed, I started off with 10% more weight on the right spoileron than the left. I should add that this plane requires very little spoileron deflection for good high alpha angle of attack (AOA) and stability, actually only about 1/4" deflection. So this 10% difference did help, but I felt more could be done. So through several flights, I increased it by 5% at a time until I had 30% more "weight" on the right spoileron than the left.
Although not eliminating the effects of prop wash completely, it makes high alpha handling much smoother and more relaxing even. The plane still drifts slightly to the left, but would take about 100 ft to do a full circle on it's own if I let it go and for about 80% of the time flies pretty straight with no right rudder input, requiring just the odd minor correction now and then instead of constant right rudder input like I needed without "differential spoilerons".
This setup made right turns much easier, it still occasionally got hung up/delayed, but about 80% of the time, it only needed gentle right rudder input to come around to the right and it responded almost right away instead of having considerable delay like often happened without the "differential spoilerons".
However, as my sage friend from Alabama (Stephan) has often said, aerodynamics is all about compromise, change one thing, it can often affect another. So there is a caution I will pass along if you try this that I learned today (didn't result in a crash, just a little more excitement than I wanted at the time... :/). If I got too slow or didn't have the power setting up high enough when I deployed these differential spoilerons, it would pull to the right and drop the right wing.
I have been able to alleviate some of this again with my radio. In the er9x firmware I can set the speed with which the function deploys, so I slowed the right spoileron down about 30%, meaning it would take a couple seconds longer to fully deploy than the left one, making for a more balanced transition into high alpha. This didn't mean once established I could get lazy, as it would still drop a wing or pull right if I got too slow with too little power, but once established, the improvement in handling is well worth the risk in my experience.
So now basically I have 1/4" deflection on my left spoileron and about 3/8" deflection on my right spoileron, doesn't seem like much, but it is a 50% increase in deflection to help with high alpha prop wash.
So if you have a radio that allows for this type of adjustment and have noticed this constant "drift to the left/difficulty turning right" with your planes in high alpha, I encourage you to try it or think about it. Start off high obviously to allow for recovery if it goes wonky on you and I would suggest starting off with a small difference working up in very small increments until you find what you like. Just because 30% worked for me on this plane, doesn't mean it will work on all planes or that it will work for you, but even with the slight risk, I mention above, it was well worth the reward with much smoother overall handling and performance in high alpha.
Cheers,
Scott
I was out dialing in a plane today trying to optimize it's balance and handling for best high alpha performance.
Since Stephan wrote this great article http://migsrus.blogspot.ca/2014/12/trimming-rc-airplane-determining-cg.html , I have been trimming all my planes using this method and have noticed a much more responsive and balanced plane as a result as well as my CG and components being moved back significantly. I had obviously just grown used to flying my planes far too nose heavy and didn't really notice until Stephan educated me on these new methods of properly finding CG and trimming the plane for a more balanced and maneuverable setup. Big thank you to Stephan once again... :)
The planes all rotate much better in all axes which makes general handling and aerobatics much more fun and responsive.
However, as the weight has been moved back and the rotation made easier, I have also noticed the affect of prop wash in high alpha has become more pronounced, especially on the Mig I was flying today.
Stephan and I have both written articles that might help understand better what we mean about the affects of prop wash in high alpha
http://migsrus.blogspot.ca/2014/08/mig29-v4m3e3-hi-alpha-testing.html
http://migsrus.blogspot.ca/2014/08/the-high-alpha-right-turn.html
So today as I was dialing in this plane, I found that right turns in high alpha were a real challenge and that if I took my thumb off the rudder stick, it would do a left turn on it's own, completing a full circle in about 25 ft. So I suppose I could just turn left all day, but that gets pretty boring after awhile and doesn't challenge my skills much. So I fought with it, had the tail slide around pretty aggressively a few times as the rudder bit too aggressively in right turns and at one point over controlled/dumb thumbed my way into the ground. So a bit of a nose "gonk", my pride hurt more than my plane, it will be easily fixable.
But as I did my short, solitary "walk of shame", I started wondering if there was some way I could put a setting in my radio to help offset the effects of prop wash to make high alpha a bit more manageable and right turns not so difficult.
I use a Turnigy 9x radio with er9x firmware, so it is far more capable than I will probably ever utilize, but it is pretty versatile for the price.
So at first I thought about having a switch where when I started high alpha I could select preset rudder trim to the right. This would help, but would then reduce my rudder travel to the right if I needed it (which I knew I would). It is also another switch to select in addition to spoilerons which I like to use for high alpha to help keep the plane more stable and the nose up a little higher without too much elevator/elevon deflection. Not a good option as too many switches spells trouble for my limited skills.
Then I thought, why not have the spoilerons deflect differently? In other words, have the right spoileron deflect a bit more, helping to keep the plane from pulling left all the time. I'm sure others have thought of this and use it, but honestly I never have heard or read about anyone using it. I have always been locked into the paradigm that both spoilerons have to be deflected the same amount in high alpha, drilled into me by whoever had my attention at the time when I was still learning high alpha.
So as I looked at the blemished nose on my plane I thought, what the heck, I've had one crash already, what is the worst that could happen?
So since I can adjust the "weight" or percentage of the spoileron deflection individually in each of the "aileron/spoileron" servos without affecting how the aileron works when spoilerons are not employed, I started off with 10% more weight on the right spoileron than the left. I should add that this plane requires very little spoileron deflection for good high alpha angle of attack (AOA) and stability, actually only about 1/4" deflection. So this 10% difference did help, but I felt more could be done. So through several flights, I increased it by 5% at a time until I had 30% more "weight" on the right spoileron than the left.
Although not eliminating the effects of prop wash completely, it makes high alpha handling much smoother and more relaxing even. The plane still drifts slightly to the left, but would take about 100 ft to do a full circle on it's own if I let it go and for about 80% of the time flies pretty straight with no right rudder input, requiring just the odd minor correction now and then instead of constant right rudder input like I needed without "differential spoilerons".
This setup made right turns much easier, it still occasionally got hung up/delayed, but about 80% of the time, it only needed gentle right rudder input to come around to the right and it responded almost right away instead of having considerable delay like often happened without the "differential spoilerons".
However, as my sage friend from Alabama (Stephan) has often said, aerodynamics is all about compromise, change one thing, it can often affect another. So there is a caution I will pass along if you try this that I learned today (didn't result in a crash, just a little more excitement than I wanted at the time... :/). If I got too slow or didn't have the power setting up high enough when I deployed these differential spoilerons, it would pull to the right and drop the right wing.
I have been able to alleviate some of this again with my radio. In the er9x firmware I can set the speed with which the function deploys, so I slowed the right spoileron down about 30%, meaning it would take a couple seconds longer to fully deploy than the left one, making for a more balanced transition into high alpha. This didn't mean once established I could get lazy, as it would still drop a wing or pull right if I got too slow with too little power, but once established, the improvement in handling is well worth the risk in my experience.
So now basically I have 1/4" deflection on my left spoileron and about 3/8" deflection on my right spoileron, doesn't seem like much, but it is a 50% increase in deflection to help with high alpha prop wash.
So if you have a radio that allows for this type of adjustment and have noticed this constant "drift to the left/difficulty turning right" with your planes in high alpha, I encourage you to try it or think about it. Start off high obviously to allow for recovery if it goes wonky on you and I would suggest starting off with a small difference working up in very small increments until you find what you like. Just because 30% worked for me on this plane, doesn't mean it will work on all planes or that it will work for you, but even with the slight risk, I mention above, it was well worth the reward with much smoother overall handling and performance in high alpha.
Cheers,
Scott
Sunday, December 7, 2014
Trimming a RC Airplane & Determining CG from Mean Area Chord in Airplane Designing
In the background, Scott and I have been working on a Mig-35 version of the RCP Mig-29v4. We have referred to this plane in many ways including using NAMC. I have had more time to think than fly and build lately. As they say, "a little bit of knowledge is a dangerous thing."
In the test flight of my last prototype build, I set the CG using the "arc" method that is basically a powered glide test. I personally like the arc over the glide method for several reasons. I prefer to be climbing at altitude when I am doing surface control adjustments; it gives me more room for recovery. More importantly, the arc method is more dynamic visually. Another method I found in Googling away my time was to fly inverted and the attitude of the plane and amount of elevator required indicate the CG. Next time out, I will do all three maneuvers. Here is a great summary of trimming a RC plane (arc method was found in a different post):
Trimming a RC Plane
How do you determine the CG on a wing? Off to Google and my textbooks and the best method is to determine the mean area chord (MAC). MAC is the line that divides the wing into equal areas. Depending on the wing type, the CG is 25-33% of the MAC from the leading edge for straight and delta wings respectively. Using my program, I calculated the MAC in two different ways. First I used the "true" wing lateral to the side plates (blue in picture) and second I used the "full" wing to the centerline of the plane (green). The picture has a lot of overlays: the original Mig-29v4 wing, Mig-35 prototype wing, and the MAC drawings. The black and red CG are what I determined after test flights with Mig-35. The Mig-29 v4 CG is marked in simple text. The red CG was where I determined the plane to be very slightly nose heavy and just ahead of the calculated MAC CG for a full wing. Clearly, the "true" wing in blue is not the way to calculate the MAC.

From a design standpoint, now that I know the wing CG, what is the relationship between the fuselage and the wing? It's simple, balanced with varying polar moments (see my prior posts about polar moment of inertia). The CG of a fuselage including the tail but without the wing would intersect the CG of the wing. In RC we have battery and ESC as the movable components to adjust the CG and polar moment. On my present build that is foam only stage of construction without KFs or components, the CG is presently 2 inches aft.
My next question to ponder is how do the KFs affect the wings center of lift (COL)? Will they change the COL and hence the calculated CG? For straight wings from wind tunnel testing, we know the ideal KF is 40%. There is no similar data on the best KF ratio for swept or delta wings. In some prior flight testing on the Mig-29v3, I found that 40% was better than the stock KF that was varied from root to tip. With this present build I am going to trim the plane with and without 40% KFs to see if the wing COL changes the measured CG.
The epoxy has set, back to building the latest prototype.
Stephan
In the test flight of my last prototype build, I set the CG using the "arc" method that is basically a powered glide test. I personally like the arc over the glide method for several reasons. I prefer to be climbing at altitude when I am doing surface control adjustments; it gives me more room for recovery. More importantly, the arc method is more dynamic visually. Another method I found in Googling away my time was to fly inverted and the attitude of the plane and amount of elevator required indicate the CG. Next time out, I will do all three maneuvers. Here is a great summary of trimming a RC plane (arc method was found in a different post):
Trimming a RC Plane
How do you determine the CG on a wing? Off to Google and my textbooks and the best method is to determine the mean area chord (MAC). MAC is the line that divides the wing into equal areas. Depending on the wing type, the CG is 25-33% of the MAC from the leading edge for straight and delta wings respectively. Using my program, I calculated the MAC in two different ways. First I used the "true" wing lateral to the side plates (blue in picture) and second I used the "full" wing to the centerline of the plane (green). The picture has a lot of overlays: the original Mig-29v4 wing, Mig-35 prototype wing, and the MAC drawings. The black and red CG are what I determined after test flights with Mig-35. The Mig-29 v4 CG is marked in simple text. The red CG was where I determined the plane to be very slightly nose heavy and just ahead of the calculated MAC CG for a full wing. Clearly, the "true" wing in blue is not the way to calculate the MAC.
From a design standpoint, now that I know the wing CG, what is the relationship between the fuselage and the wing? It's simple, balanced with varying polar moments (see my prior posts about polar moment of inertia). The CG of a fuselage including the tail but without the wing would intersect the CG of the wing. In RC we have battery and ESC as the movable components to adjust the CG and polar moment. On my present build that is foam only stage of construction without KFs or components, the CG is presently 2 inches aft.
My next question to ponder is how do the KFs affect the wings center of lift (COL)? Will they change the COL and hence the calculated CG? For straight wings from wind tunnel testing, we know the ideal KF is 40%. There is no similar data on the best KF ratio for swept or delta wings. In some prior flight testing on the Mig-29v3, I found that 40% was better than the stock KF that was varied from root to tip. With this present build I am going to trim the plane with and without 40% KFs to see if the wing COL changes the measured CG.
The epoxy has set, back to building the latest prototype.
Stephan
Sunday, November 23, 2014
Mig-35 Update. This one is the real deal!!
I wanted to update you on the latest skunkworks prototype from RTMS. Scott and I have been working really hard and building like crazy to finalize this plane. I took Scott's latest mods, drawings (see his prior posts for details) and plugged them into my drawing program and put some Roll Tide mojo on his mods. Our plane has slowly morphed from a Mig-29 to the Mig-35. So I took some designer liberties with Scott's mods and further morphed our hybrid Mig-29 the final step. I also tweaked the RCP Mig-29v4 here there as I saw needed for fit.
This latest iteration clearly deserves to christened the Mig-35 NAMC. I have used this naming on previous planes but this plane is truly worthy. It is the culmination of 7 months of thinking, designing, testing and validating between Scott and I. The key has been are ability to reproduce flight results on various mods, good or bad. No fluff here, just hundreds of test flights with quantitative flight data. Hence our creed:
Puto, Consilium, Test et Convalidandum
Here is the real deal and inspiration of our latest design:

Here is the Mig-29M2 (renamed Mig-35) plans I used as a template in adding the final scale mods:

I'll go over some of the design major changes. The tail section is where you can see the biggest differences. The vert stabs now extend all the way to the KFs for a scale appearance. I also angled the back bottom of the back of the side plate to give a more streamlined scale look. There still should be plenty of clearance for the elevons at landing. I am not expecting a change in high alpha flight with loss of surface area of the side plates which act as bottom side vert stabs. This will be tested of course by Scott and I both. I had hoped to have this plane finished today, but I ran out of FoamTac, carbon, motors.... Here is a picture of it dry fitted for build verification:


When fitting the canopy, I found that the bottom were it meets the fuselage had a tendency to get moved in creating a coke bottle look--I don't like that look. Scott and I have also shortened and given the nose a less pointy appearance. When forming the nose, I start by taping the top to the sides front back to front and tack weld in-between the tape. I then fill the gaps with strips for strength. Here is the new nose and the piece I designed to fit insure the canopy doesn't get narrowed:

Here is a picture of the new NAMCv4 nose vs the RCP Mig-29v4:

Here is a picture of the new NAMCv4 nose vs the NAMCv3:

Here are some views, of the tail where I deKardashianed it even further from our last design:


For those of you that have read of my quest for straight line knife edge flight, you may noticed I went with simple full length rudders on this latest build. Lately, I been having more fun with stall maneuvers which are much easier since my polar moment epiphany (Scott inspired this with his moving the motor forward) and tightening up the center of mass.
I changed to bottom mounted motor mount reinforcements. I glue the wing plate to the fuselage. Then I glue the motor mount to the wing plate only. I then lift the bottom fuselage piece and glue in the motor reinforcements. Note: the top photo is a dry fit demonstration of how they fit. Additionally, these reinforcements make it easier to give the tapered appearance that I like:


The last major change I made was to extend the bottom side LERX along the engine nacelle. This really is an appearance mod and OCD me going crazy with the drawing software. Here is picture of the extended KF:

Obviously you can tell the weather hasn't been good for me to log in a lot flights. I've blogged, been drawing and designing modifications, and building. So no recent crashes and I now have a Mig squadron. I am running out of parts, that slow boat from China needs to hurry up! From left to right, Mig-29v4, Mig-35v2 (built for speed with smaller LERX and wing), Mig-35 NAMCv3, and the latest Mig-35 NAMCv4:


Many thanks to my Canuck buddy and fellow aviator veteran Scott for being such a great partner! I also want to thank Dave Powers and Scott Lott from for allowing us to work on the Mig-29, truly what I believe is the ultimate foamie park jet ever designed. If you haven't already, visit http://www.rcpowers.com/community/pages/home/ and buy the v4 package. Stay tuned for more about the RCP Mig-35 NAMC.
Stephan
This latest iteration clearly deserves to christened the Mig-35 NAMC. I have used this naming on previous planes but this plane is truly worthy. It is the culmination of 7 months of thinking, designing, testing and validating between Scott and I. The key has been are ability to reproduce flight results on various mods, good or bad. No fluff here, just hundreds of test flights with quantitative flight data. Hence our creed:
Puto, Consilium, Test et Convalidandum
Here is the real deal and inspiration of our latest design:
Here is the Mig-29M2 (renamed Mig-35) plans I used as a template in adding the final scale mods:
I'll go over some of the design major changes. The tail section is where you can see the biggest differences. The vert stabs now extend all the way to the KFs for a scale appearance. I also angled the back bottom of the back of the side plate to give a more streamlined scale look. There still should be plenty of clearance for the elevons at landing. I am not expecting a change in high alpha flight with loss of surface area of the side plates which act as bottom side vert stabs. This will be tested of course by Scott and I both. I had hoped to have this plane finished today, but I ran out of FoamTac, carbon, motors.... Here is a picture of it dry fitted for build verification:
When fitting the canopy, I found that the bottom were it meets the fuselage had a tendency to get moved in creating a coke bottle look--I don't like that look. Scott and I have also shortened and given the nose a less pointy appearance. When forming the nose, I start by taping the top to the sides front back to front and tack weld in-between the tape. I then fill the gaps with strips for strength. Here is the new nose and the piece I designed to fit insure the canopy doesn't get narrowed:
Here is a picture of the new NAMCv4 nose vs the RCP Mig-29v4:
Here is a picture of the new NAMCv4 nose vs the NAMCv3:
Here are some views, of the tail where I deKardashianed it even further from our last design:
For those of you that have read of my quest for straight line knife edge flight, you may noticed I went with simple full length rudders on this latest build. Lately, I been having more fun with stall maneuvers which are much easier since my polar moment epiphany (Scott inspired this with his moving the motor forward) and tightening up the center of mass.
I changed to bottom mounted motor mount reinforcements. I glue the wing plate to the fuselage. Then I glue the motor mount to the wing plate only. I then lift the bottom fuselage piece and glue in the motor reinforcements. Note: the top photo is a dry fit demonstration of how they fit. Additionally, these reinforcements make it easier to give the tapered appearance that I like:
The last major change I made was to extend the bottom side LERX along the engine nacelle. This really is an appearance mod and OCD me going crazy with the drawing software. Here is picture of the extended KF:
Obviously you can tell the weather hasn't been good for me to log in a lot flights. I've blogged, been drawing and designing modifications, and building. So no recent crashes and I now have a Mig squadron. I am running out of parts, that slow boat from China needs to hurry up! From left to right, Mig-29v4, Mig-35v2 (built for speed with smaller LERX and wing), Mig-35 NAMCv3, and the latest Mig-35 NAMCv4:
Many thanks to my Canuck buddy and fellow aviator veteran Scott for being such a great partner! I also want to thank Dave Powers and Scott Lott from for allowing us to work on the Mig-29, truly what I believe is the ultimate foamie park jet ever designed. If you haven't already, visit http://www.rcpowers.com/community/pages/home/ and buy the v4 package. Stay tuned for more about the RCP Mig-35 NAMC.
Stephan
Thursday, November 20, 2014
Mig-35 NAMCv4 Preview
Now that I have figured out my vector drawing software, the modifications are limitless!
After maidening the v3 today, I went straight to Staples to print out the v4. I'll detail the mods later, but I wanted to post the new vertical stabilizers. I gave them a scale profile and trimmed down the bottom edge of the side plate. Bonus, the fit was perfect.
The quest continues for the ultimate Mig!
Stephan

After maidening the v3 today, I went straight to Staples to print out the v4. I'll detail the mods later, but I wanted to post the new vertical stabilizers. I gave them a scale profile and trimmed down the bottom edge of the side plate. Bonus, the fit was perfect.
The quest continues for the ultimate Mig!
Stephan
Mig-35 NAMCv3 Maiden and Flight report
Nothing like the anticipation of tossing a new plane in the air and hoping for the best.
I have a spreadsheet in which for all my planes I have entered servo travel, dual rates, control surface throw, and even which hole the control rods go in the servo and control horns. This really helps control the anxiety and preventing thumbing when into the ground from too much throw.
Back to the Mig-35. Wow. A brief flight report. All of the changes had positive benefits in the full flight envelope. In the past, some of my changes (symmetric foil, downsized LERX and wing for example) benefited only one part of the envelope.
The biggest and most beneficial change on this plane is the lower polar moment of inertia as a result of moving the motor forward an inch. Bringing the tail plate closer to the wing trailing edge also improved rotation. With a lower polar moment, I found the plane was easier to rotate in pitch and yaw. Rudder stall turns were smoother and easier to accomplish. The plane was also very crisp in the pitch axis. Perhaps the best way to describe it is that the time from stick input to attitude change in the plane was shorter, i.e. more responsive.
Another maneuver that I have been working on is the climb to a stall and then into a tail slide. This is easier to accomplish with a tail heavy plane, but not worth the detrimental effect to the rest of the flight envelope--in my opinion. With this plane I was able to do a couple of slides with much less effort.
I am not a hovering kind of flyer (I prefer to do a prolonged stall and hang it there briefly), but for a plane to hover it must be well balanced. Kiko12 on the RCP forum has mastered hovering with a plane of his design. Dave Powers and I talked last night about plane balance. Until I had my "polar moment epiphany" after reading Scott's flight report on the Mig-35, I had not given it much thought outside of EPPE. When I've been revisiting polar moment and its effect, I have been tunneled visioned. I was addressing ESC and battery placement in the horizontal plane. Dave was telling me how kiko12 balances his planes in the vertical plane as well. Dave has been experimenting with platforms to elevate the battery in the fuselage. The battery bay in the Mig is below the wing plate. Thinking back on it, the battery in my pattern plane was mounted even with the center of the wing.
As you guessed, RTMS skunkworks has a new mission. I am going to optimize battery and ESC positioning both in the horizontal and vertical axes and see how this affects all aspects of the flight envelope. Goal 1 is shortest possible distance from the front of the battery to the motor mount. Goal 2 is center the battery with the wing plate.
Stephan
See comment below about this picture

I have a spreadsheet in which for all my planes I have entered servo travel, dual rates, control surface throw, and even which hole the control rods go in the servo and control horns. This really helps control the anxiety and preventing thumbing when into the ground from too much throw.
Back to the Mig-35. Wow. A brief flight report. All of the changes had positive benefits in the full flight envelope. In the past, some of my changes (symmetric foil, downsized LERX and wing for example) benefited only one part of the envelope.
The biggest and most beneficial change on this plane is the lower polar moment of inertia as a result of moving the motor forward an inch. Bringing the tail plate closer to the wing trailing edge also improved rotation. With a lower polar moment, I found the plane was easier to rotate in pitch and yaw. Rudder stall turns were smoother and easier to accomplish. The plane was also very crisp in the pitch axis. Perhaps the best way to describe it is that the time from stick input to attitude change in the plane was shorter, i.e. more responsive.
Another maneuver that I have been working on is the climb to a stall and then into a tail slide. This is easier to accomplish with a tail heavy plane, but not worth the detrimental effect to the rest of the flight envelope--in my opinion. With this plane I was able to do a couple of slides with much less effort.
I am not a hovering kind of flyer (I prefer to do a prolonged stall and hang it there briefly), but for a plane to hover it must be well balanced. Kiko12 on the RCP forum has mastered hovering with a plane of his design. Dave Powers and I talked last night about plane balance. Until I had my "polar moment epiphany" after reading Scott's flight report on the Mig-35, I had not given it much thought outside of EPPE. When I've been revisiting polar moment and its effect, I have been tunneled visioned. I was addressing ESC and battery placement in the horizontal plane. Dave was telling me how kiko12 balances his planes in the vertical plane as well. Dave has been experimenting with platforms to elevate the battery in the fuselage. The battery bay in the Mig is below the wing plate. Thinking back on it, the battery in my pattern plane was mounted even with the center of the wing.
As you guessed, RTMS skunkworks has a new mission. I am going to optimize battery and ESC positioning both in the horizontal and vertical axes and see how this affects all aspects of the flight envelope. Goal 1 is shortest possible distance from the front of the battery to the motor mount. Goal 2 is center the battery with the wing plate.
Stephan
See comment below about this picture
Wednesday, November 19, 2014
RTMS "Roll Tide Mig Shop" Mig-35 NAMCv3 Build is Complete
Down here at the RTMS I have been watching enviously Scott's flight reports on the latest 'n greatest NAMC evolution of the RCP Mig-29v4. My build is complete, now I'm waiting on the weather to cooperate. To summarize the modifications:
1. Motor mount moved 1 inch forward to decrease the polar moment of inertia
2. Trailing edge of wing straightened at root to look more like the Mig-35
3. Side plate shortened 1 inch to bring horizontal stabilizer closer to wing trailing edge
4. Fuselage nose cone shortened to make appearance less "pointy"
5. Inboard vertical rudders in my quest for straight line knife edge flight
6. Downsized elevons to decrease TVAWT and EPPE
7. Shortened ailerons to decrease wing tip stalls
What is that paint scheme? Well that's what I end up with when I have a bunch of half empty spray paint cans. Next build will be a base coat of spray paint with a camouflage scheme topcoat. Acrylic paint is water based like the glue I use for glassing, so the spray paint makes for a nice barrier and doesn't dissolve the glue.
Build & Setup:
1. Carbon 4mm wing main and 3mm leading edges
2. Glassed hinges, vert stabs, side plates, tail plate, elevons and all leading edges
3. TowerPro carbon 9g servos on rudders and ailerons
4. Hitech 82MG servos for the elevons (I have a stock pile of these from when I thought these were necessary, Scott has shown plastic gear servos are fine)
5. Dealmax 2700 motor with Turnigy Plush 40 amp ESC
6. Spoilerons, Flaperons, Rudder brakes, and my favorite mix-ailerons off for high alpha, take off and landing, and high speed grass mowing flybys
7. 16 5/8 oz/471 gms dry and 23 1/4/662 with 2200 battery
Here she is:

Here is a nose to nose comparison:

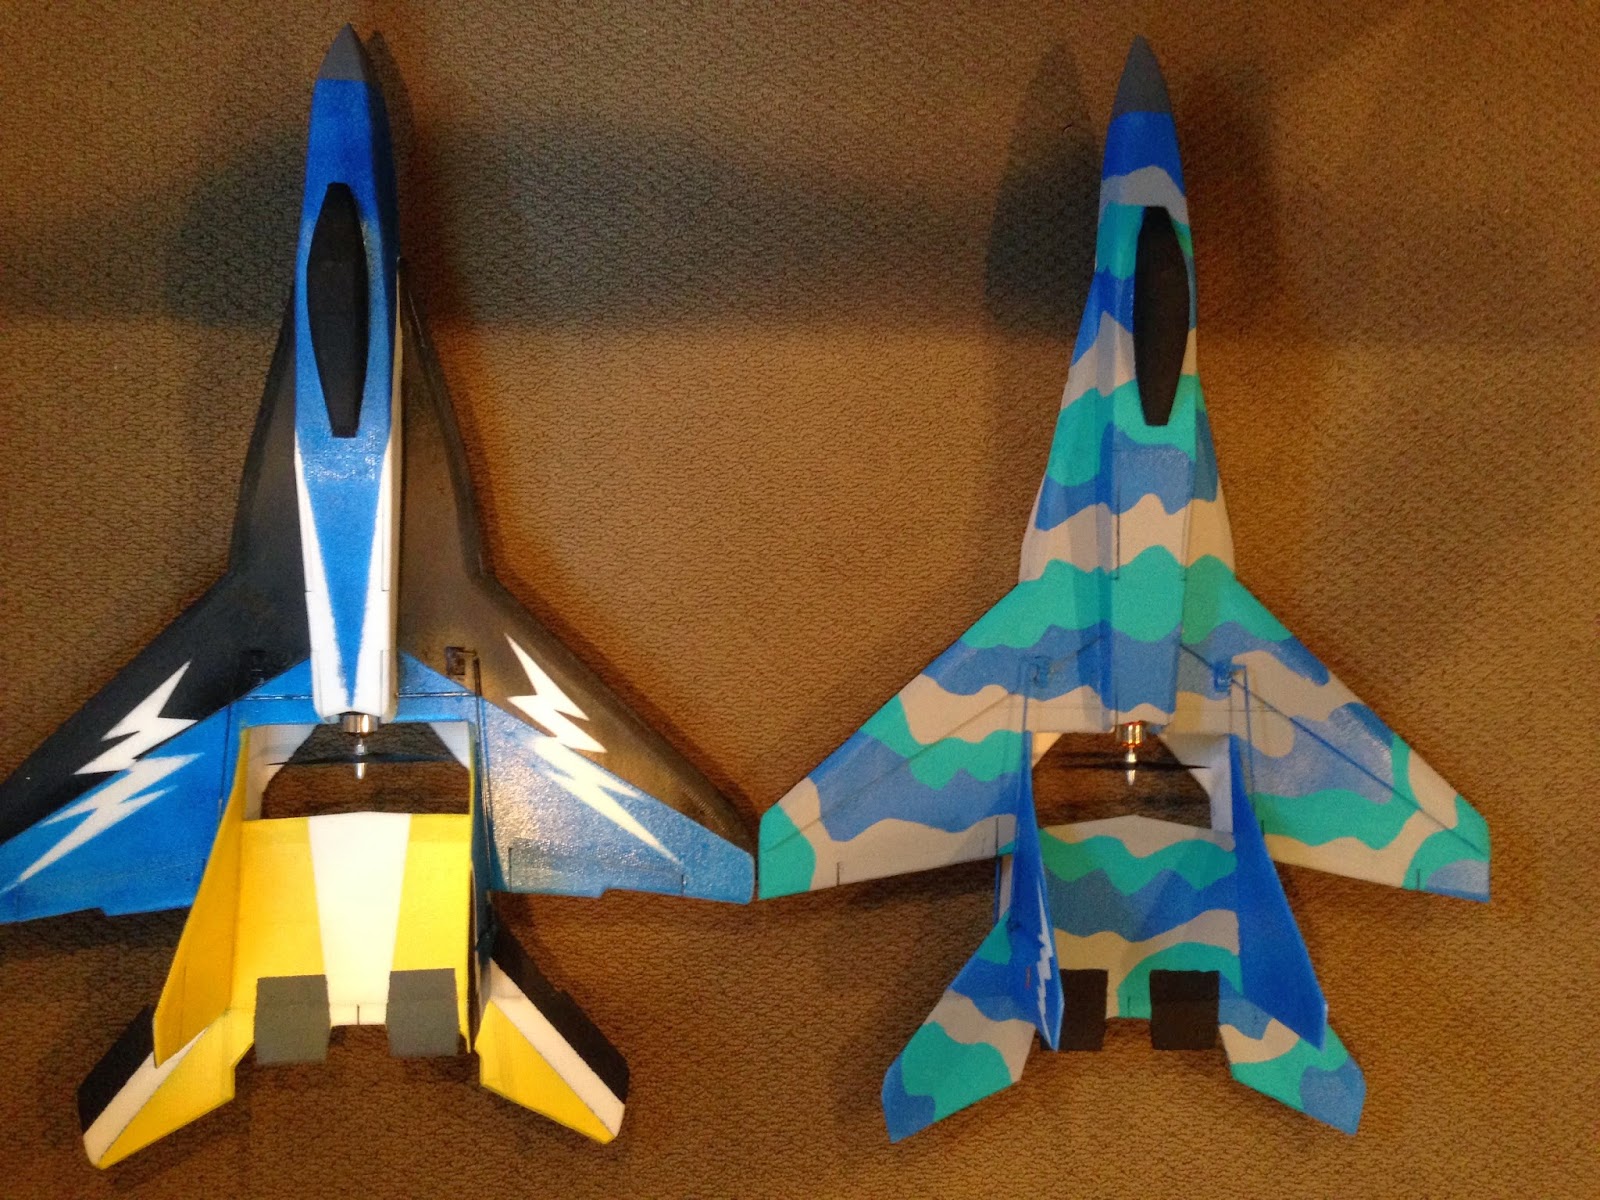
Here is top view to see the differences in lengths overall and side plate, and motor mount. The plane on the right is stock build Mig-29v4:

The camo Mig-35 NAMCv2 has downsized LERX and wing leading edges which are more scale:
Maiden and flight report to follow as soon as wind and weather breaks.
Stephan
1. Motor mount moved 1 inch forward to decrease the polar moment of inertia
2. Trailing edge of wing straightened at root to look more like the Mig-35
3. Side plate shortened 1 inch to bring horizontal stabilizer closer to wing trailing edge
4. Fuselage nose cone shortened to make appearance less "pointy"
5. Inboard vertical rudders in my quest for straight line knife edge flight
6. Downsized elevons to decrease TVAWT and EPPE
7. Shortened ailerons to decrease wing tip stalls
What is that paint scheme? Well that's what I end up with when I have a bunch of half empty spray paint cans. Next build will be a base coat of spray paint with a camouflage scheme topcoat. Acrylic paint is water based like the glue I use for glassing, so the spray paint makes for a nice barrier and doesn't dissolve the glue.
Build & Setup:
1. Carbon 4mm wing main and 3mm leading edges
2. Glassed hinges, vert stabs, side plates, tail plate, elevons and all leading edges
3. TowerPro carbon 9g servos on rudders and ailerons
4. Hitech 82MG servos for the elevons (I have a stock pile of these from when I thought these were necessary, Scott has shown plastic gear servos are fine)
5. Dealmax 2700 motor with Turnigy Plush 40 amp ESC
6. Spoilerons, Flaperons, Rudder brakes, and my favorite mix-ailerons off for high alpha, take off and landing, and high speed grass mowing flybys
7. 16 5/8 oz/471 gms dry and 23 1/4/662 with 2200 battery
Here she is:
Here is a nose to nose comparison:
Here is top view to see the differences in lengths overall and side plate, and motor mount. The plane on the right is stock build Mig-29v4:
The camo Mig-35 NAMCv2 has downsized LERX and wing leading edges which are more scale:
Maiden and flight report to follow as soon as wind and weather breaks.
Stephan
Subscribe to:
Posts (Atom)